

How To Activate And Enable Facebook Timeline Profile Right Now [Guide]
Today Facebook at F8 developers conference unveiled new features of Facebook that will totally transformed the Facebook. One of the key feature that were discussed at F8 was Timeline. Timeline will totally change the layout of your profile. It won’t be available for a few more weeks, only developers can access the new Timeline profile. We have just posted a detailed guide on how to get Facebook Timeline Feature in just simple steps.
 Facebook Timeline is only available for open graph developers and if you are not so you can become easily an open graph developer and can get the Facebook Timeline profile.
Important note:
- You probably don’t want to do this unless you’re actually a developer. Expect bugs.
- Only you will see your timeline at first (unless you decide otherwise), but your timeline will take over your homepage after a few days. My timeline was automatically hard-set to go public on September 29th.
- It seems that if you login into Facebook on another machine, Timeline gets disabled automatically on all of your machines. With that said, it seems you can get back to your timeline (but ONLY after following the steps below) by navigating to http://www.facebook.com/YOURUSERNAMEHERE?sk=timeline
- You’ll need to have a “verified” account for one of the steps, which means you need a credit card or phone number attached to the account.
Here’s how to Activate And Enable Facebook Timeline Right Now:
- Log into Facebook
- Enable developer mode, if you haven’t already. To do this, type “developer” into the search box, click the first result (it should be an app made by Facebook with a few hundred thousand users), and add the app.
- Jump into the developer app (if Facebook doesn’t put you there automatically, it should be in your left-hand tool bar)
- Create a new app (don’t worry — you wont actually be submitting this for anyone else to see/use). Give your shiny new app any display name and namespace you see fit. Read through and agree to the Platform Privacy agreement. This is the step you need to be verified for.
- Ensure you’re in your new app’s main settings screen. You should see your app’s name near the top of the page
- Look for the “Open Graph” header, and click the “Get Started using open graph” link.
- Create a test action for your app, like “read” a “book”, or “eat” a “sandwich”
- This should drop you into an action type configuration page. Change a few of the default settings (I changed the past tense of “read” to “redd” — again, only you can see this unless you try and submit your application to the public directory), and click through all three pages of settings
- Wait 2-3 minutes
- Go back to your Facebook homescreen. An invite to try Timeline should be waiting at the top of the page
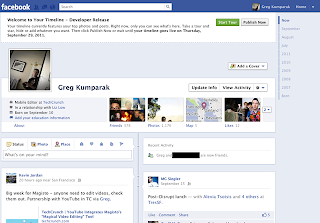
Now visit your profile page and Facebook will give you the option to switch to Timeline view
Facebook Timeline is only available for open graph developers and if you are not so you can become easily an open graph developer and can get the Facebook Timeline profile.
Important note:
- You probably don’t want to do this unless you’re actually a developer. Expect bugs.
- Only you will see your timeline at first (unless you decide otherwise), but your timeline will take over your homepage after a few days. My timeline was automatically hard-set to go public on September 29th.
- It seems that if you login into Facebook on another machine, Timeline gets disabled automatically on all of your machines. With that said, it seems you can get back to your timeline (but ONLY after following the steps below) by navigating to http://www.facebook.com/YOURUSERNAMEHERE?sk=timeline
- You’ll need to have a “verified” account for one of the steps, which means you need a credit card or phone number attached to the account.
Here’s how to Activate And Enable Facebook Timeline Right Now:
- Log into Facebook
- Enable developer mode, if you haven’t already. To do this, type “developer” into the search box, click the first result (it should be an app made by Facebook with a few hundred thousand users), and add the app.
- Jump into the developer app (if Facebook doesn’t put you there automatically, it should be in your left-hand tool bar)
- Create a new app (don’t worry — you wont actually be submitting this for anyone else to see/use). Give your shiny new app any display name and namespace you see fit. Read through and agree to the Platform Privacy agreement. This is the step you need to be verified for.
- Ensure you’re in your new app’s main settings screen. You should see your app’s name near the top of the page
- Look for the “Open Graph” header, and click the “Get Started using open graph” link.
- Create a test action for your app, like “read” a “book”, or “eat” a “sandwich”
- This should drop you into an action type configuration page. Change a few of the default settings (I changed the past tense of “read” to “redd” — again, only you can see this unless you try and submit your application to the public directory), and click through all three pages of settings
- Wait 2-3 minutes
- Go back to your Facebook homescreen. An invite to try Timeline should be waiting at the top of the page
Now visit your profile page and Facebook will give you the option to switch to Timeline view
 Facebook Timeline is only available for open graph developers and if you are not so you can become easily an open graph developer and can get the Facebook Timeline profile.
Important note:
- You probably don’t want to do this unless you’re actually a developer. Expect bugs.
- Only you will see your timeline at first (unless you decide otherwise), but your timeline will take over your homepage after a few days. My timeline was automatically hard-set to go public on September 29th.
- It seems that if you login into Facebook on another machine, Timeline gets disabled automatically on all of your machines. With that said, it seems you can get back to your timeline (but ONLY after following the steps below) by navigating to http://www.facebook.com/YOURUSERNAMEHERE?sk=timeline
- You’ll need to have a “verified” account for one of the steps, which means you need a credit card or phone number attached to the account.
Here’s how to Activate And Enable Facebook Timeline Right Now:
- Log into Facebook
- Enable developer mode, if you haven’t already. To do this, type “developer” into the search box, click the first result (it should be an app made by Facebook with a few hundred thousand users), and add the app.
- Jump into the developer app (if Facebook doesn’t put you there automatically, it should be in your left-hand tool bar)
- Create a new app (don’t worry — you wont actually be submitting this for anyone else to see/use). Give your shiny new app any display name and namespace you see fit. Read through and agree to the Platform Privacy agreement. This is the step you need to be verified for.
- Ensure you’re in your new app’s main settings screen. You should see your app’s name near the top of the page
- Look for the “Open Graph” header, and click the “Get Started using open graph” link.
- Create a test action for your app, like “read” a “book”, or “eat” a “sandwich”
- This should drop you into an action type configuration page. Change a few of the default settings (I changed the past tense of “read” to “redd” — again, only you can see this unless you try and submit your application to the public directory), and click through all three pages of settings
- Wait 2-3 minutes
- Go back to your Facebook homescreen. An invite to try Timeline should be waiting at the top of the page
Now visit your profile page and Facebook will give you the option to switch to Timeline view
Facebook Timeline is only available for open graph developers and if you are not so you can become easily an open graph developer and can get the Facebook Timeline profile.
Important note:
- You probably don’t want to do this unless you’re actually a developer. Expect bugs.
- Only you will see your timeline at first (unless you decide otherwise), but your timeline will take over your homepage after a few days. My timeline was automatically hard-set to go public on September 29th.
- It seems that if you login into Facebook on another machine, Timeline gets disabled automatically on all of your machines. With that said, it seems you can get back to your timeline (but ONLY after following the steps below) by navigating to http://www.facebook.com/YOURUSERNAMEHERE?sk=timeline
- You’ll need to have a “verified” account for one of the steps, which means you need a credit card or phone number attached to the account.
Here’s how to Activate And Enable Facebook Timeline Right Now:
- Log into Facebook
- Enable developer mode, if you haven’t already. To do this, type “developer” into the search box, click the first result (it should be an app made by Facebook with a few hundred thousand users), and add the app.
- Jump into the developer app (if Facebook doesn’t put you there automatically, it should be in your left-hand tool bar)
- Create a new app (don’t worry — you wont actually be submitting this for anyone else to see/use). Give your shiny new app any display name and namespace you see fit. Read through and agree to the Platform Privacy agreement. This is the step you need to be verified for.
- Ensure you’re in your new app’s main settings screen. You should see your app’s name near the top of the page
- Look for the “Open Graph” header, and click the “Get Started using open graph” link.
- Create a test action for your app, like “read” a “book”, or “eat” a “sandwich”
- This should drop you into an action type configuration page. Change a few of the default settings (I changed the past tense of “read” to “redd” — again, only you can see this unless you try and submit your application to the public directory), and click through all three pages of settings
- Wait 2-3 minutes
- Go back to your Facebook homescreen. An invite to try Timeline should be waiting at the top of the page
Now visit your profile page and Facebook will give you the option to switch to Timeline view
How to select all friends on Facebook for invite
In the age of Facebook all of us are involved in inviting friends for a page or guests for an event but it becomes so irritating and tedious of clicking on every friend to select.
We feel that why doesn't facebook has a select all friends button in the pop up box that appears. But here at Dummy Essentials we have a solution for you.
Using this code will help you select all your friends without the hassle of checking on every box for every friend. Make sure you scroll down to the end of the pop up page so that all friends from A-Z appear on that box and then copy paste the code into the browser and press enter.
javascript:elms=document.getElementsByName("checkableitems[]");for (i=0;i<elms.length;i++){if (elms[i].type="checkbox" )elms[i].click()};
Using this code will help you select all your friends without the hassle of checking on every box for every friend. Make sure you scroll down to the end of the pop up page so that all friends from A-Z appear on that box and then copy paste the code into the browser and press enter.
MS Excel: Change Sum to Average or Count in Pivot
Pivot Tables is a very good tool in excel which helps to easily analyze and consolidate entire data into a reporting format or in a structural way. While creating a pivot table the fields that you drag into the Values section are by default either sum or count.
 Now in case we have around 50 fields to be dragged into the values section which in turn will come as different columns. Now in case we want to change the data columns from Sum to Count or from Sum to Average then we would need to do it manually as shown below for all the fields one by one.
 Now doing this can be a very tedious task and also very time consuming. Instead we are providing you with a add-in which can help you to do all of this with just one click. Below is how to do it. Also this addin comes with a lot of many other options such as Count all, Max All, Product All.
 All of it you can use at your convenience.
You can download this add-in from here
Now take a leap in speeding up your working with pivots in excel.
All of it you can use at your convenience.
You can download this add-in from here
Now take a leap in speeding up your working with pivots in excel.
What is Google GMMXLE ?
 Wondering what MMXL on Google Homepage is? This came up on 1-1-11. This is Google's way of wishing us a Happy New Year and their claim to be the best in 2011.
Wonder how? Here is the explanation.
Roman format
M - 1000
X - 10
I - 1
and if you look at the logo carefully you could see the message is GMMXIe and not GMMXLe , so the fifth character is I and not L.
So MMXI indicates 1000+1000+10+1 i.e 2011.
MMXI - 2011
Well, Google might have thought in a different way also, enclosing 2011 in G and e, they symbolically indicates they are going to rule the internet in 2011.
Wondering what MMXL on Google Homepage is? This came up on 1-1-11. This is Google's way of wishing us a Happy New Year and their claim to be the best in 2011.
Wonder how? Here is the explanation.
Roman format
M - 1000
X - 10
I - 1
and if you look at the logo carefully you could see the message is GMMXIe and not GMMXLe , so the fifth character is I and not L.
So MMXI indicates 1000+1000+10+1 i.e 2011.
MMXI - 2011
Well, Google might have thought in a different way also, enclosing 2011 in G and e, they symbolically indicates they are going to rule the internet in 2011.
Rotate Video using VLC Player
Most of you would have faced this problem of viewing the videos when they are vertically shot. Now assuming, you have no clue on how to view or rotate that video. I atleast end up rotating my laptop to view it.
 A box pops up and under the Video Effects section and Basic tab as you see Transform checkbox unchecked.
 Click on the check box and the options below will get activated. Now select how you want to rotate your video and click close.


 And you are all done with your video ready to watch.
But here at Dummy Essentials we bring to you how can we rotate a video using VLC player. For instance if your video is as below:

You can easily rotate this video using VLC player as demonstrated. Click on Tools and select Effects and Filters. Alternatively you can also press Ctrl + E.

 A box pops up and under the Video Effects section and Basic tab as you see Transform checkbox unchecked.
 Click on the check box and the options below will get activated. Now select how you want to rotate your video and click close.

As soon as you press Close, the video will be rotated. Now you can enjoy your video.

Also in case your video is tilted in some randomly different manner as below. You can as well rotate that video.

In order to rotate such a kind of video. Under the Video Effects section in the Geometry tab. Click on Rotate check box and it will give you a wheel to rotate. Use the wheel to rotate and straighten your video.
 And you are all done with your video ready to watch.
VPS Web Hosting
Let’s learn what a VPS web hosting is, and how it helps us. VPS stands for Virtual Private Server. In simple terms, here one server is split into multiple virtual servers that can run on their own operating system as well as they can be rebooted individually. Out of the many VPS web hosting providers, some outweigh others for their high quality and low cost modern VPS solution. Now, before we go ahead and understand more about VPS, let us get a brief idea about the other two kinds of hosting services that are known:
• A shared web hosting service
• A dedicated hosting service
In a shared web hosting, many websites reside on one web server, which is connected to the internet. Each site, here has its own separate partition on the server.
In a dedicated web hosting, the entire server is given to one client and is not shared by anyone.
Since, VPS web hosting falls between limitations of shared hosting and flexibility of dedicated hosting, it picks the best of both and bridges the gap between them.
Let us highlight below, few of the advantages that stand out here.
How a VPS webhosting is better than a Shared web hosting:
High Customization Level: In VPS web hosting, you have the freedom to have your own IP address and a choice to reboot your VPS at any time. Besides that Web, Mail and Domains can be customized easily. It also provides a Server Level Customization, through which you get a better SEO and site ranking.
Burstable Memory: This is a unique feature associated with VPS Web Hosting, where you are given extra memory beyond guaranteed memory. This extra bit of memory is known as burstable memory. Example if your VPS has 256 MB guaranteed memory and 1024 MB burstable memory, it means even after you have used all of guaranteed memory, you still have 768 MB burstable memory available, if there is enough free memory on host server. This feature is excellent for unexpected traffic spikes such as in Digg or Stumble.
Scalability: VPS hosting is scalable. Whether you need a small allocation to run a email server or large one to support heavy traffic and database applications, you will find one of the VPS plans suitable for your needs.
The Kind of Sites that would benefit from a Virtual Private Server Web hosting:
Any e-commerce site with large and multiple database and high traffic would benefit the most along with other growing sites, that would like to enjoy the benefits of a dedicated server without having the need to bear the expenses of one. This is a perfect middle ground between a shared hosting and a dedicated server. VPS web hosting is an ideal solution to all who are serious about establishing a strong place in the web world. If you feel you cannot compromise on the SEO and other benefits, going in for a VPS web hosting is the best option for you.
Another Award For Dummy Essentials!
Hello there, We have created a list of the best looking blogs throughout the web, something which your site has been noted for its striking and thoughtful design, along with the hard work you put into your site. http://www.warlockmedia.com/awards-one.html We appreciate how much work and dedication it takes into keeping up a blog which others find interesting, so we would like to personally congratulate you. Kindest Regards, ClaireThis mail that we received a short while ago, took us completely by surprise, for being listed as one of the top 10 best looking blogs of 2010. It is indeed a sweet gesture by the team of Warlock Media, to have considered our blog worthy of this prestigious award. We are honored to be listed one among the top ten blogs there. More can be read on visiting the website page, The Warlock Media Awards by clicking on the image below.
 A screenshot of what is mentioned for Dummy Essentials is shown below.
 We would like to thank all for encouraging Dummy Essentials to reach for the best. Thank you, Claire.
Make Phone Calls via Computer Using Bluetooth
Microsoft has come up with a wonderful feature in Windows 7. It allows you to make calls from your computer via your mobile using Bluetooth.
Just to clarify this won’t help you to save bucks. It’s just that it will help you not to hold the phone and also keeps you away from the radiation as well as give relaxation to your hands
Here is how you can use your PC to make calls:
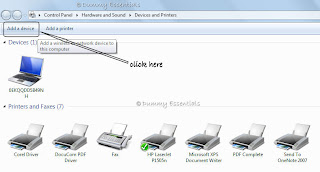
In the first place you need to add your mobile as a device on your computer. For this, click on "Start" menu and point to "Devices and Printers".
 Once you open the “Devices & Printers” add a device (mobile) to your computer as shown below:
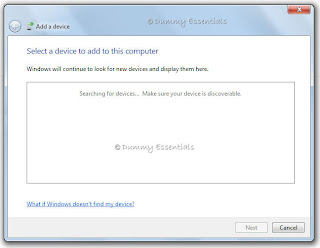
 Once you click on "Add a Device" a window will pop up. Find your device and add it to your computer. Prior to that make sure that Bluetooth for both the devices is switched on.
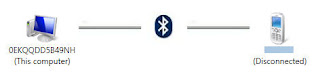
 Once you add your device (mobile) to your computer it will show up under the devices section.
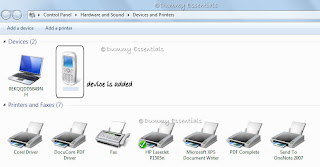 As you see above the mobile is now added to the list. Now double click on the mobile icon and a window will pop up as shown.
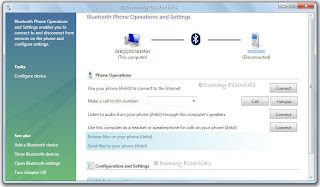 Put the number in the space provided you want to call and click on call as shown below.
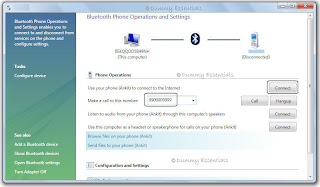 Now the call will be performed through your computer's Bluetooth while connecting it to your mobile's Bluetooth. So its basically the mobile making the call but you hear it on your computer.
 When you want to disconnect the call just click on Hangup. Enjoy the free style calling.
 Once you open the “Devices & Printers” add a device (mobile) to your computer as shown below:
 Once you click on "Add a Device" a window will pop up. Find your device and add it to your computer. Prior to that make sure that Bluetooth for both the devices is switched on.
 Once you add your device (mobile) to your computer it will show up under the devices section.
 As you see above the mobile is now added to the list. Now double click on the mobile icon and a window will pop up as shown.
 Put the number in the space provided you want to call and click on call as shown below.
 Now the call will be performed through your computer's Bluetooth while connecting it to your mobile's Bluetooth. So its basically the mobile making the call but you hear it on your computer.
 When you want to disconnect the call just click on Hangup. Enjoy the free style calling.
The Adobe flash plugin has crashed
If you get this error message that "The Adobe flash plugin has crashed" and your Firefox browser crashes and shuts down, the problem is relatively new, and is being encountered by a lot of people using Firefox. At the initial phase we have figured out a piece of solution to give some relief.
 We need to make a few changes in the configuration. This is how:

 The following page would open up:
 Now, In the "Filter" box, type:
dom.ipc.plugins.timeoutSecs
Now, In the "Filter" box, type:
dom.ipc.plugins.timeoutSecs
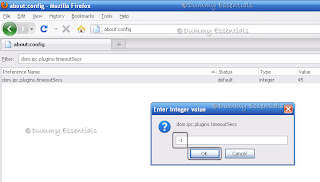
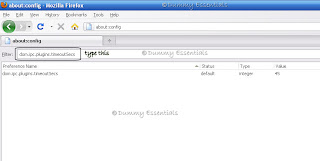 Double click "dom.ipc.plugins.timeoutSecs", under the "Preference Name" and in the "Enter Integer Value" pop up window, set the value as:
-1
and Click on "OK"
Double click "dom.ipc.plugins.timeoutSecs", under the "Preference Name" and in the "Enter Integer Value" pop up window, set the value as:
-1
and Click on "OK"
 This would disable hang protection of firefox browser.
Also this is what Adobe has to say about this issue "Our application, which has run fine for the last year on all browsers and flash combination, suddenly crash any time we try to load it. It was build using Flex 3 and hasn't generally had stability problems" Adding to this they have said "Flash 10.1 is the one which is facing this issue but is working fine with MAC and IE7"
Let's go ahead and try to resolve this issue.
 We need to make a few changes in the configuration. This is how:
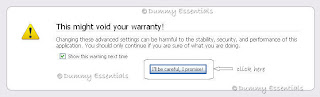
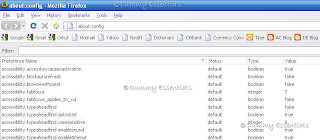
In the Firefox address bar, type about:config and press Enter.

You would probably get a certificate stating: This might void your warranty! You can ignore that message this time and click on the button: I'll be careful, I promise!
 The following page would open up:
 Now, In the "Filter" box, type:
dom.ipc.plugins.timeoutSecs
Now, In the "Filter" box, type:
dom.ipc.plugins.timeoutSecs
 Double click "dom.ipc.plugins.timeoutSecs", under the "Preference Name" and in the "Enter Integer Value" pop up window, set the value as:
-1
and Click on "OK"
Double click "dom.ipc.plugins.timeoutSecs", under the "Preference Name" and in the "Enter Integer Value" pop up window, set the value as:
-1
and Click on "OK"
 This would disable hang protection of firefox browser.


Listed/Ranked:
The Tech Directory
Cluster Maps