

How To Start PC In Safe Mode
The best way to diagnose a problem with your PC is to start Windows in Safe mode. Reason being, when you boot your PC in safe mode, you have access to only basic drivers for the computer to function, so the processor is free from running a lot of data.
Let's see how we can boot the PC in a Safe mode. There are two ways to it. You can select whichever way you are comfortable with.
In the first method, to get into safe mode, restart your PC. Before you get the Windows XP screen (shown below), press the F8 key on your keyboard.
 Pressing the F8 key would take you to the "Advanced Options" menu.
 Here you are presented with various options to select from. We will briefly describe what each option would do, if you select that.
 Pressing the F8 key would take you to the "Advanced Options" menu.
 Here you are presented with various options to select from. We will briefly describe what each option would do, if you select that.
- Safe Mode: It loads minimum processes required to start Windows XP
- Safe Mode with Networking: Along with starting computer in safe mode it includes drivers needed for network connectivity
- Safe Mode with Command Prompt: On starting the computer, it displays Command Prompt instead of Windows GUI.
- Enable Boot Logging: It troubleshoots boot problems and creates a log to help you identify the device or driver which is causing problem during startup.
- Enable VGA mode: It starts the PC in standard VGA mode by using the video driver. You can use this option if you are getting distorted video display.
- Last known Good configuration: It restores the entire configuration that was used last when your computer functioned successfully. This is the safest and should be tried out first in Safe booting.
- Debugging mode: It uses kernel debugger to troubleshooting.
- Start Windows Normally: Starts Windows in normal mode.
- Reboot: Restarts the computer.
Using the arrow keys on your keyboard, highlight "Safe Mode" and press "Enter". When a dialog box shows up stating that "Windows is running in safe mode". To proceed to work in safe mode, click yes. Click on the "Yes" button and you can start working in Safe mode.
 Once you complete making necessary changes, restart your PC and this time let it start in the Normal mode.
In case you are not comfortable logging into safe mode in the method described above, you can try this:
Click on the "Start" menu on the taskbar and then click on "Run"
Once you complete making necessary changes, restart your PC and this time let it start in the Normal mode.
In case you are not comfortable logging into safe mode in the method described above, you can try this:
Click on the "Start" menu on the taskbar and then click on "Run"
 In the "Run" dialog box type: msconfig and then click on "OK"
 Next, in the "System Configuration Utility" window that open, under the "BOOT.INI" tab, within the "Boot Options" area, check mark on "/SAFEBOOT" box. Click on "Apply" and then "OK". Now when you boot, Windows will go into Safe mode.
A brief description of options along with /SAFEBOOT:
Next, in the "System Configuration Utility" window that open, under the "BOOT.INI" tab, within the "Boot Options" area, check mark on "/SAFEBOOT" box. Click on "Apply" and then "OK". Now when you boot, Windows will go into Safe mode.
A brief description of options along with /SAFEBOOT:
- Minimal: This option uses a minimal set of device drivers and services to start Windows.
- Network: This option uses a minimal set of device drivers and services to start Windows along with the drivers needed to load networking.
- DSREPAIR: This is the "Directory Services Repair Console" . You don't need to use this.
- Minimal(AlternateShell): This option is the same as Safe mode, except that Cmd.exe starts instead of Windows Explorer.
 When you no longer need Safe mode, you need to repeat the process and uncheck that box.
Create a Restore Point
Incase you wish to make some changes to your computer, the result of which you are not sure of, its always a good idea to create a "Restore Point" which means that your computer takes a snapshot of everything that is stored in your computer so that if you desire you can roll back to the point where you created the restore point and all the changes made thereafter will be lost.
Today we will show how to create a "Restore Point" and how to get our PC back to that point.
Let's start by creating a "Restore Point" first. To do so,
Click on "Start" menu followed by clicking on "Run"
 In the "Run" window, type:
msconfig
and hit on the "OK" button
In the "Run" window, type:
msconfig
and hit on the "OK" button
 A "System Configuration Utility" window would open, where under the "General" tab, click on "Launch System Restore"
 In the "Welcome to System Restore" screen, click on "create a restore point" and then click on "Next".
 In the next screen: "Create a Restore Point", for the "Restore Point description" type in any name that you wish to. We typed in 'Create'. Further to which click on the "Create" button at the bottom of the screen.
 The next screen displays a Restore Point has been created with the details (Date, Time and Name) of the restore point. Click on "Close"
 Restart your computer.
Now we come to the second part. You have made changes to the registry or installed some software and don't know how to undo the changes. All you need to do is to get back your PC working as it was before by getting it to work as it did when we created a restore point for it. So, how do we get the computer to work on the same restore point that we created earlier? To do so:
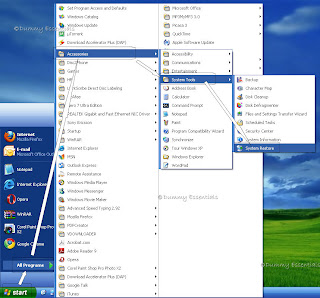
Click on "Start" menu -> All Programs -> Accessories -> System Tools -> System Restore
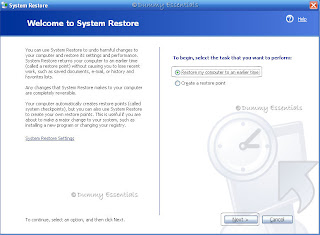
 You again get back to "Welcome to System Restore" screen. This time you need to click on "Restore my computer to an earlier time" and click on "Next"
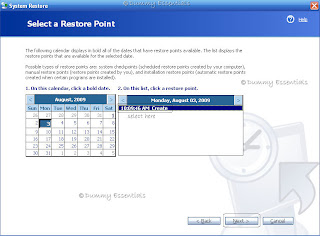
 In the next screen: "Select a Restore Point", in the second list you will see a list of restore points that you created. This being the first one here, it shows just one: "Create", the one that we created sometime back, above. Select the one you wish your computer to revert to or select the latest one and click on "Next"
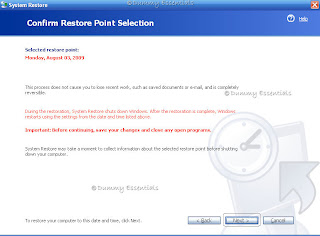
 In the next screen: "Confirm Restore Point Selection", confirm the same by clicking on "Next" else you can go back and select another.
 During restoration, system restore will shut down the windows and once the restoration is complete, it restarts using the settings from time and date you selected.
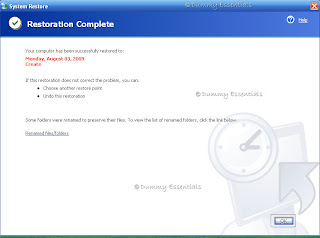 Once the system restarts, you get the "Restoration Complete" screen. Click on "OK" and you are done with.
 You again get back to "Welcome to System Restore" screen. This time you need to click on "Restore my computer to an earlier time" and click on "Next"
 In the next screen: "Select a Restore Point", in the second list you will see a list of restore points that you created. This being the first one here, it shows just one: "Create", the one that we created sometime back, above. Select the one you wish your computer to revert to or select the latest one and click on "Next"
 In the next screen: "Confirm Restore Point Selection", confirm the same by clicking on "Next" else you can go back and select another.
 During restoration, system restore will shut down the windows and once the restoration is complete, it restarts using the settings from time and date you selected.
 Once the system restarts, you get the "Restoration Complete" screen. Click on "OK" and you are done with.


Listed/Ranked:
The Tech Directory
Cluster Maps