

Resizing the Recycle Bin
The Recycle Bin is a flexible place, willing to enlarge itself, as necessary, to accept your recently deleted files. By default, the space allocated by Windows for the Recycle Bin is up to ten percent of your hard-drive space. If you think about it, that’s a ton of space. Say you have an 80GB drive. That means that the Recycle Bin can possibly occupy up to 8GB of your drive. That could be a huge number of files and is probably more than you would ever need.
The Recycle Bin is constructed so that it keeps whatever ends up there until you manually delete it (or until the allocated disk space fills up). If the disk space fills up, then the oldest files in the Recycle Bin are deleted to make way for the newer items. If you have 8GB (or more) set aside for the Recycle Bin, the sheer size of the allocated area means you’re wasting a lot of disk space.
The solution is to change the amount of disk space allocated to the Recycle Bin. This is what you need to do.
Right click the Recycle Bin icon and choose "Properties"
 In the "Properties" dialog box, under the "Global" tab, select the "Use One Setting for All Drives option". Use the slider to specify a smaller percentage of your hard drive for Recycle Bin space.
 If you have a large drive or several large drives, consider setting the slider as low as one percent. (Remember that one percent of 80GB is 800MB. That’s still a large block of disk space for the Recycle Bin.)
Click "OK". Resizing the Recycle Bin help unclutter your system as Windows doesn’t need to track as many deleted files, the operating system is more responsive.
If you have a large drive or several large drives, consider setting the slider as low as one percent. (Remember that one percent of 80GB is 800MB. That’s still a large block of disk space for the Recycle Bin.)
Click "OK". Resizing the Recycle Bin help unclutter your system as Windows doesn’t need to track as many deleted files, the operating system is more responsive.
 In the "Properties" dialog box, under the "Global" tab, select the "Use One Setting for All Drives option". Use the slider to specify a smaller percentage of your hard drive for Recycle Bin space.
 If you have a large drive or several large drives, consider setting the slider as low as one percent. (Remember that one percent of 80GB is 800MB. That’s still a large block of disk space for the Recycle Bin.)
Click "OK". Resizing the Recycle Bin help unclutter your system as Windows doesn’t need to track as many deleted files, the operating system is more responsive.
If you have a large drive or several large drives, consider setting the slider as low as one percent. (Remember that one percent of 80GB is 800MB. That’s still a large block of disk space for the Recycle Bin.)
Click "OK". Resizing the Recycle Bin help unclutter your system as Windows doesn’t need to track as many deleted files, the operating system is more responsive.
Remove Permanent Shortcuts From Desktop
Ever tried deleting those shortcuts or icons which don't like to budge from their positions and occupy unnecessary space on your desktop? Well, we can remove them with the help of Registry Editor, deleting the entry from there.
For eg. here we take an example of this Sony Ericsson File Manager, which gets installed along with the Sony Ericsson PC Suite and gets seated forever on your desktop, never for you to use.
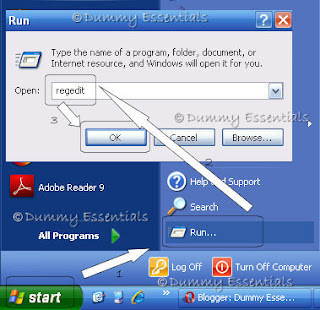
 To remove this, click on "Start" menu and select "Run". In the "Run" window that opens, type "regedit" and click on "OK"
 In the "Registry Editor" window that opens, navigate to this path:
My Computer\HKEY_LOCAL_MACHINE\SOFTWARE\Microsoft\ ......
In the "Registry Editor" window that opens, navigate to this path:
My Computer\HKEY_LOCAL_MACHINE\SOFTWARE\Microsoft\ ......
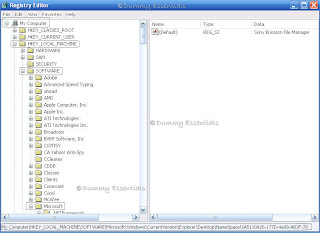 ..followed further to:
...\Windows\CurrentVersion\Explorer\Desktop\NameSpace\{A5110426-177D-4e08-AB3F-785F10B4439C}
..followed further to:
...\Windows\CurrentVersion\Explorer\Desktop\NameSpace\{A5110426-177D-4e08-AB3F-785F10B4439C}
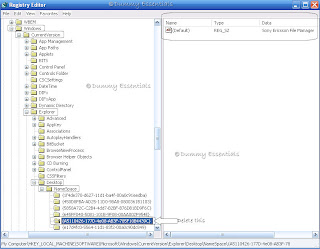 When you click on the entry, {A5110426-177D-4e08-AB3F-785F10B4439C} on the right side of the pane you see the details that it is a Sony Ericsson File Manager entry. So delete this entry to remove the icon permanently from your desktop. On deleting and refreshing your desktop, you will notice that the icon is gone forever.
Note: Any changes that you make to the Registry Editor are irreversible. So take a lot of care to know what exactly you are deleting from there. It can damage the smooth working of your system big time, for a small mistake from your end.
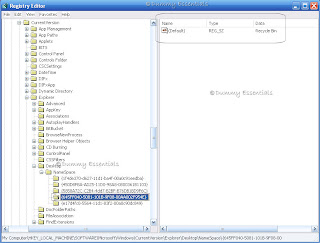
Incase you wish to delete "Recycle bin" from your desktop, you need to delete the following entry from the same folder: {645FF040-5081-101B-9F08-00AA002F954E}
When you click on the entry, {A5110426-177D-4e08-AB3F-785F10B4439C} on the right side of the pane you see the details that it is a Sony Ericsson File Manager entry. So delete this entry to remove the icon permanently from your desktop. On deleting and refreshing your desktop, you will notice that the icon is gone forever.
Note: Any changes that you make to the Registry Editor are irreversible. So take a lot of care to know what exactly you are deleting from there. It can damage the smooth working of your system big time, for a small mistake from your end.
Incase you wish to delete "Recycle bin" from your desktop, you need to delete the following entry from the same folder: {645FF040-5081-101B-9F08-00AA002F954E}
 To remove this, click on "Start" menu and select "Run". In the "Run" window that opens, type "regedit" and click on "OK"
 In the "Registry Editor" window that opens, navigate to this path:
My Computer\HKEY_LOCAL_MACHINE\SOFTWARE\Microsoft\ ......
In the "Registry Editor" window that opens, navigate to this path:
My Computer\HKEY_LOCAL_MACHINE\SOFTWARE\Microsoft\ ......
 ..followed further to:
...\Windows\CurrentVersion\Explorer\Desktop\NameSpace\{A5110426-177D-4e08-AB3F-785F10B4439C}
..followed further to:
...\Windows\CurrentVersion\Explorer\Desktop\NameSpace\{A5110426-177D-4e08-AB3F-785F10B4439C}
 When you click on the entry, {A5110426-177D-4e08-AB3F-785F10B4439C} on the right side of the pane you see the details that it is a Sony Ericsson File Manager entry. So delete this entry to remove the icon permanently from your desktop. On deleting and refreshing your desktop, you will notice that the icon is gone forever.
Note: Any changes that you make to the Registry Editor are irreversible. So take a lot of care to know what exactly you are deleting from there. It can damage the smooth working of your system big time, for a small mistake from your end.
Incase you wish to delete "Recycle bin" from your desktop, you need to delete the following entry from the same folder: {645FF040-5081-101B-9F08-00AA002F954E}
When you click on the entry, {A5110426-177D-4e08-AB3F-785F10B4439C} on the right side of the pane you see the details that it is a Sony Ericsson File Manager entry. So delete this entry to remove the icon permanently from your desktop. On deleting and refreshing your desktop, you will notice that the icon is gone forever.
Note: Any changes that you make to the Registry Editor are irreversible. So take a lot of care to know what exactly you are deleting from there. It can damage the smooth working of your system big time, for a small mistake from your end.
Incase you wish to delete "Recycle bin" from your desktop, you need to delete the following entry from the same folder: {645FF040-5081-101B-9F08-00AA002F954E}

All About Your Desktop!
Desktop is your monitor's screen where all your work takes place. It is the first screen which you see after logging into windows. Here we can create Files and Folders and arrange them all over the screen. Each program runs in its own little window on top of the desktop. When we initially install windows, your desktop is clean with just the "Recycle bin" seated there. This is how the "Desktop" would look like:
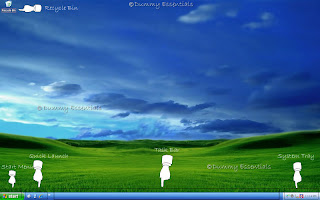 Lets discuss here the anatomy of your desktop:
As shown in the figure above, you would notice, we have divided desktop into these main parts:
1. The Start Menu: It is seen at the taskbar’s left edge, lets you locate and run programs.
2. Quick Launch: a customizable toolbar that lets you display the Windows Desktop or start a program, such as Internet Explorer with a single click.
3. Task Bar: Bar which rests along the desktop’s bottom edge and lists the programs and
files you’re currently working on.
4. System Tray: also called as Notification Area, is on the right side of the Taskbar on the Windows interface used to display the system clock, status of various functions, such as speaker volume, network connection and few other programs as per your desire which would start when you reboot your computer.
5. Recycle Bin: A place which stores your deleted files and lets you safely retrieve accidentally
deleted files.
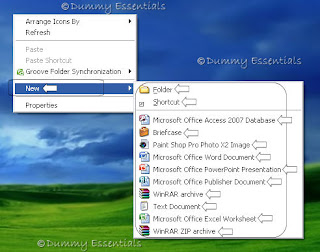
You can start any new project directly from your desktop: Right click on the desktop, choose "New", and select the project you wish to work on from the popup menu. (The menu lists most of your computer’s programs for quick and easy access.)
Lets discuss here the anatomy of your desktop:
As shown in the figure above, you would notice, we have divided desktop into these main parts:
1. The Start Menu: It is seen at the taskbar’s left edge, lets you locate and run programs.
2. Quick Launch: a customizable toolbar that lets you display the Windows Desktop or start a program, such as Internet Explorer with a single click.
3. Task Bar: Bar which rests along the desktop’s bottom edge and lists the programs and
files you’re currently working on.
4. System Tray: also called as Notification Area, is on the right side of the Taskbar on the Windows interface used to display the system clock, status of various functions, such as speaker volume, network connection and few other programs as per your desire which would start when you reboot your computer.
5. Recycle Bin: A place which stores your deleted files and lets you safely retrieve accidentally
deleted files.
You can start any new project directly from your desktop: Right click on the desktop, choose "New", and select the project you wish to work on from the popup menu. (The menu lists most of your computer’s programs for quick and easy access.)
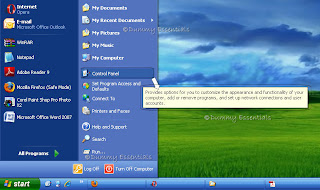
 Incase you are confused about a program in your program list and its functionality, or an icon or on your desktop, all you need to do is to get your cursor there and place it on its top and windows will popup a little box explaining what that thing is and what is its fuction. eg, as demonstrated below, we got the cursor over "control panel" to get windows to tell us, what is it actually there for.
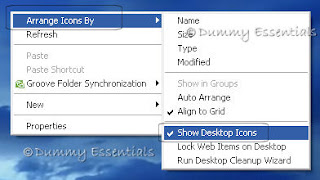
 Incase all the icons on your desktop disappear, leaving it empty, reason would be probably because windows XP hid everything in a misguided attempt to be helpful. To bring your work back as it was, right click on your empty desktop and choose "Arrange Icons By" from the popup menu. Finally, choose "Show Desktop Icons" to make everything reappear with no harm done.
 We will continue with a few more tips on how to organize your desktop in our next post.
 Lets discuss here the anatomy of your desktop:
As shown in the figure above, you would notice, we have divided desktop into these main parts:
1. The Start Menu: It is seen at the taskbar’s left edge, lets you locate and run programs.
2. Quick Launch: a customizable toolbar that lets you display the Windows Desktop or start a program, such as Internet Explorer with a single click.
3. Task Bar: Bar which rests along the desktop’s bottom edge and lists the programs and
files you’re currently working on.
4. System Tray: also called as Notification Area, is on the right side of the Taskbar on the Windows interface used to display the system clock, status of various functions, such as speaker volume, network connection and few other programs as per your desire which would start when you reboot your computer.
5. Recycle Bin: A place which stores your deleted files and lets you safely retrieve accidentally
deleted files.
You can start any new project directly from your desktop: Right click on the desktop, choose "New", and select the project you wish to work on from the popup menu. (The menu lists most of your computer’s programs for quick and easy access.)
Lets discuss here the anatomy of your desktop:
As shown in the figure above, you would notice, we have divided desktop into these main parts:
1. The Start Menu: It is seen at the taskbar’s left edge, lets you locate and run programs.
2. Quick Launch: a customizable toolbar that lets you display the Windows Desktop or start a program, such as Internet Explorer with a single click.
3. Task Bar: Bar which rests along the desktop’s bottom edge and lists the programs and
files you’re currently working on.
4. System Tray: also called as Notification Area, is on the right side of the Taskbar on the Windows interface used to display the system clock, status of various functions, such as speaker volume, network connection and few other programs as per your desire which would start when you reboot your computer.
5. Recycle Bin: A place which stores your deleted files and lets you safely retrieve accidentally
deleted files.
You can start any new project directly from your desktop: Right click on the desktop, choose "New", and select the project you wish to work on from the popup menu. (The menu lists most of your computer’s programs for quick and easy access.)
 Incase you are confused about a program in your program list and its functionality, or an icon or on your desktop, all you need to do is to get your cursor there and place it on its top and windows will popup a little box explaining what that thing is and what is its fuction. eg, as demonstrated below, we got the cursor over "control panel" to get windows to tell us, what is it actually there for.
 Incase all the icons on your desktop disappear, leaving it empty, reason would be probably because windows XP hid everything in a misguided attempt to be helpful. To bring your work back as it was, right click on your empty desktop and choose "Arrange Icons By" from the popup menu. Finally, choose "Show Desktop Icons" to make everything reappear with no harm done.
 We will continue with a few more tips on how to organize your desktop in our next post.
Simple Ways Which Increase The Speed Of Your PC!
- Boot the PC completely before you attempt to open any application.
- Keep minimum number of shortcuts on the desktop because roughly every shortcut created on the desktop uses up to 500 bytes of RAM.
- Empty the recycle bin regularly.Those files are still a part of your hard drive till they are not removed permanently.
- Clean the temporary internet files regularly.
- Defragment your hard drive once a month. Substantial amount of space on your hard drive is free and files are rearranged resulting in faster running applications. When we defragment the drive, data is physically arranged there so that applications load faster.
- Partition your hard drive. Install all large Softwares (like PSP, Photoshop etc) in the second partition. Windows uses all the available empty space in C drive as virtual memory when your Computer RAM is full. Keep the C Drive as empty as possible.
- When installing new Softwares disable the option of creating an icon for them in system tray. They use up available RAM, and also slow down the booting of your PC. Also disable the option of starting the application automatically when the PC boots.
- Protect your PC from dust. Dust causes the CPU cooling fan to jam and slow down thereby gradually heating your CPU and affecting the processing speed.
- Wallpapers tend to slow your PC, so try getting a basic one instead of a very high resolution one.
- Update your hardware drivers as frequently as possible. New drivers tend to increase system speed especially in the case of graphics cards, their drivers are updated by the manufacturer very frequently.
- While using several programs at the same time, minimize those you are not using. This helps reduce the overload on RAM.
- The 'Starting Windows XP' message on startup can delay your booting for a couple of seconds. To get rid of this message go to c:\ and find the file Msdos.sys. Remove the Read-Only option. Next, open it in Notepad or any other text editor. Finally, go to the text 'Options' within the file and make the following changes: Add BootDelay=0. To make your booting even faster, set add Logo=0 to remove the Windows logo at startup.
- Restart only Windows: When restarting your PC, hold down Shift to only restart Windows rather than the whole system which will only take a fraction of the time.
- Turn off animations: Go to Display Settings from the Control Panel and switch to the Effects Tab. Now turn off Show Windows Content While Dragging and Smooth Edges on Screen Fonts.
- Faster Start-Menu Access: Go to the Start menu and select Run. Now type Regedit and hit Enter. The Registry Editor will appear on the screen. Now, open the folder HKEY_CURRENT_USER\Control Panel\Desktop. You should see a MenuShowDelay value. If you don't then do the following: right click on a blank space in the right pane and select New\String. Change the name in the new value to MenuShowDelay. Now that we have the MenuShowDelay value, double click on it and enter 0 in the value data field. This sets the start menu delay to 0 milliseconds.
- Screen Resolution: Try lowering your display resolution. The lower it is, the faster your PC.
- Using the Advanced Power Management feature under Windows XP gives you the option to use the sleep command. (The APM tab is present in the Power Options tool in Control Panel, but it is not enabled by default. To configure this option:In Control Panel, double-click Power Options. On the APM tab, click Enable Advanced Power Management Support.) That way, you can send your PC to sleep instead of shutting it down and then restarting it. It's as simple as pressing a button and then pressing the same button to wake it up. You can tell Windows after how many minutes/hours of inactivity to automatically sleep the machine in the Advanced Power Management section of the Control Panel.
- For faster internet access: If you use the internet for reference and the sites you visit are rarely updated then try the following. In IE (the same can be done in Netscape) go to Tools, Internet Options. Next, click on Settings... in the Temporary Internet Files section. Finally, select Never for the first option and double the amount of storage space to use, click OK.
- Benchmarking can be very useful when run frequently. It can tell you how your PC's components are performing and then compare them to other machines like yours.
- Refresh the Taskbar without restarting: If you in some way change the taskbar, either in Regedit or elsewhere, you can refresh the task bar without restarting. Hold down Ctrl Alt Del, and double click on Explorer. Say Yes to close Explorer, but no to closing Windows. This will refresh the Taskbar and system tray.
- Quick CD Eject: Instead of pushing the button on your drive, right-click your CD drive letter in My Computer and click on Eject. This will also remove any icons that have become associated with the CD drive.
- Start Up Programs: Windows can be slowed down when programs run on start up. To eliminate this, check your Start up folder. You can access it from the start menu: Start, Programs, Start Up. Another way to eliminate programs from loading even before Windows actually starts is by doing the following: Click on Start, then Run. Type msconfig. It will take quite a long time for this program to load, but when you finally see it on your screen, explore the different tabs. They all have to do with how quickly your PC boots, so select what you want, and uncheck what you don't want.
- Fonts: When Windows starts, it loads every single font in the Fonts folder. Therefore, the more fonts you have, the slower the booting process. To get rid of unwanted fonts, simply go to the Fonts folder under c:\windows and remove whatever you don't want. Fonts that have a red letter 'A' as their icon are system fonts, so don't delete them.
- Stretching Wallpapers: Don't "stretch" your wallpaper since it actually slows Windows down when you drag icons around on the desktop.
- Partitioning: A very nice little thing you can do to boost system performance. By partitioning your hard drive, splitting one physical drive into several logical ones, you can gain several advantages one of them being that if you get a virus or you accidentally format a drive, not all will be lost.


Listed/Ranked:
The Tech Directory
Cluster Maps